Setup Hyper-V Enhanced Session for Ubuntu 20.04 LTS
Introduction#
Hyper-V's Enhanced Session Mode allows it to connect to virtual machines via RDP (remote desktop protocol). This not only improves your overall virtual machine viewing experience, but it also allows the virtual machine to share devices with your computer.
Download Ubuntu 20 Desktop#
Important
Do not use Quick Create in Hyper-V Manager to create the VM. Follow these steps precisely.
Hyper-V
To learn more about, please visit Introduction to Hyper-V on Windows
Download Ubuntu Desktop 20.04 LTS from here. Subsequent 20.xx versions should also work.
Direct link as of this writing is here.
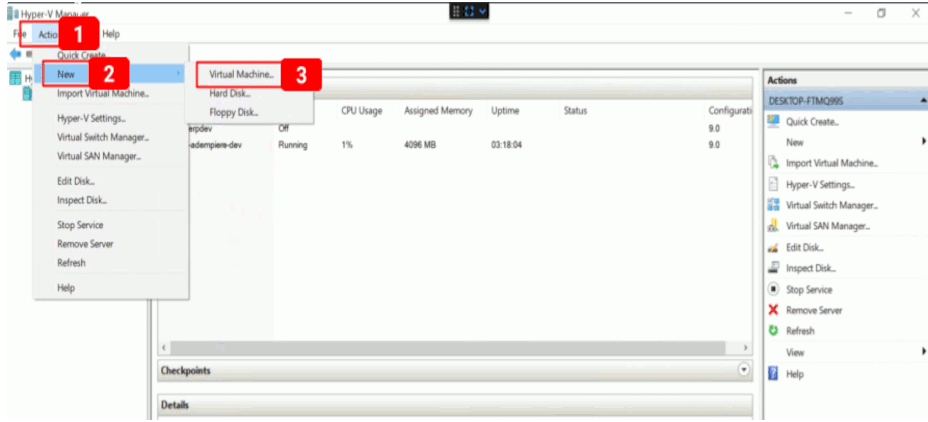
Set up Hyper-V VM#
Refer to the screencast below and follow the steps to construct the new virtual machine in Hyper-V.
- Action
- New
- Virtual Machine
- Name: ubuntu2004
- Generation: 2
- Startup memory: 4096
- Virtual hard disk
- Connection: Default Switch
- Install from bootable image file: (Use iso downloaded above)
- Press
OKbutton
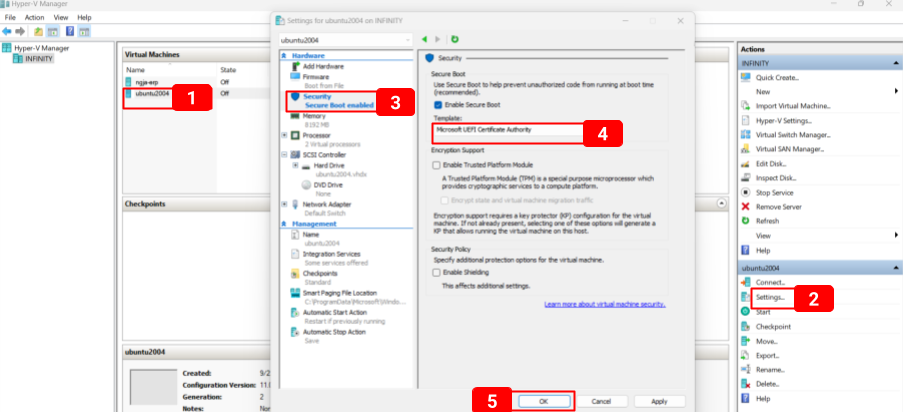
Set Ubuntu Compatible Security Template For Secure Boot#
IMPORTANT
Take a look at the screenshot below. Please follow the numbered screen sequence 1..5.
- Select the VM
- Settings
- Security
- Change Template to
Microsoft UEFI Certificate Authority - OK
Start VM#
- Select
Connect, then,Start
Install Ubuntu VM in Hyper-V#
Use all defaults.
WARNING
Do not choose Log in Automatically
Install and Run linux-vm-tool Script#
- Update local package cache.
- Install
gitclient tool.
- Clone Hyper-V Linux drivers repository.
- Select Hyper-V linux drivers for Ubuntu 20.04.
- Add the
executepermision toinstall.shscript
- Run the install script.
- Reboot the Ubuntu desktop.
The Contents of the install.sh Script#
IMPORTANT
This is solely for the sake of reference only. You're not doing anything here.
Start VM (again!)#
Click Connect, then Start
Run the script again#
Yes, after rebooting, you must execute the script again. Many online guides failed to include this step.
NOTE
This step takes a while to complete.
Set Hyper-V Transport Type#
In PowerShell, run the following:
IMPORTANT
If you named your VM something else, change the VMName argument accordingly. To see the names of all VMs, use 'Get-VM' command.
Start and connect to the virtual machine. When the VM boots up, you should now receive a prompt for resolution. You have now enabled enhanced session, which allows for copy and paste between host and VM, among other things.
IMPORTANT
If you are unable to obtain an enhanced session the first time, you can temporarily disable secure boot and restart the VM. Make sure to power down your VM before you disable secure boot. Restart your virtual machine. Then you'll experience your first Hype-V enhanced session. Please ensure that secure boot is enabled after this process.
Setup External Network Interface#
You may require access to your Ubuntu VM, which is connected to your local area network. You may need to set up an external virtual network that is bridged with your Hyper-V system's LAN interface ethernet interface card in this situation.
Refer to the screencast below to learn the steps required to construct an external virtual network and link your Ubuntu virtual machine to it.
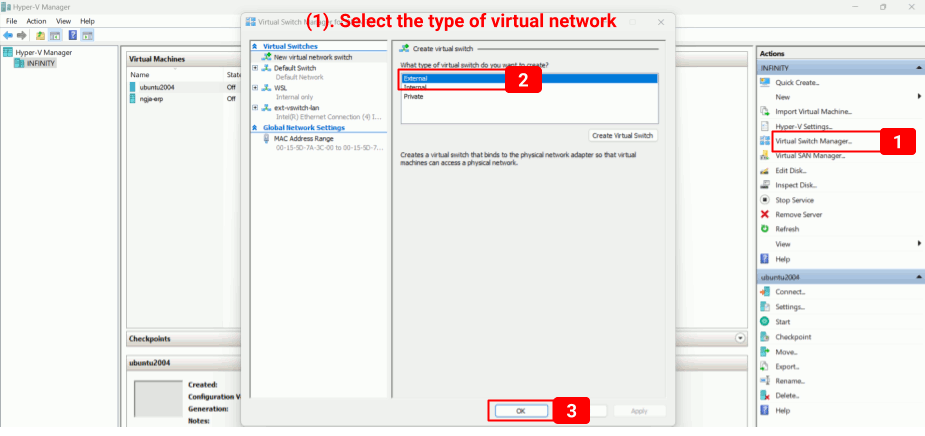
Configuring Network Interfaces#
Please follow the steps in the following screencast.
Configure Network Interface using NetworkManager cli utilty nmcli#
The command-line utility nmcli is used to manage NetworkManager and report network status. It is a suitable substitute for nm-applet and other graphical clients. In addition to controlling and displaying network device status, nmcli is used to establish, show, modify, remove, activate, and deactivate network connections. For nmcli examples that are ready to be executed, see nmcli-examples(7).
Configure Network Interface using netplan cli utilty#
What is Netplan#
Netplan is a software that allows you to easily configure networking on a Linux system. Simply write a YAML description of the network interfaces needed and what each should be configured to accomplish. Netplan will produce all of the necessary setup for your selected renderer tool based on this description.
How does it work?#
Netplan reads network settings from files named /etc/netplan/*.yaml that have been produced by administrators, installers, cloud image instantiations, or other OS deployments. During early boot, Netplan creates backend-specific configuration files in /run to hand off device control to a specified networking daemon.
Netplan Design Overview

Netplan currently works with these supported renderers
Learn more
Netplan Main Web Site:
Install Rustdesk on Ubuntu VM#
RustDesk is a full-featured open source remote control solution with minimal configuration for self-hosting and security. The open source replacement for TeamViewer and AnyDesk.
Download Rustdesk#
NOTE
The above version is current as of the time this recipe was written. The most recent version can be found at 'https://github.com/rustdesk/rustdesk/releases/'.
Install Rustdisk#
References#
We would like to take this opportunity to recognize the original authors of the following works. We couldn't have done it so easily without your help.
Setup Hyper-V enhanced session for Ubuntu 20
How to install Ubuntu 20.04 on Hyper-V with enhanced session